When you’re using Apple products, it can be really frustrating when something goes wrong. For example, you might be trying to load a photo on your iPhone and get the “there was an error connecting to the Apple ID server” message. In this article, we’re going to show you how to fix “There was an error connecting to the Apple ID server” on your Mac.
What Apple ID Verification Error Means
If you are experiencing an “error connecting to the Apple ID server” message, it’s likely that your account has been compromised. Here are some tips on how to fix the issue:
1. Verify your account security settings. Make sure that you have updated your password and sign-in name, and that you have not shared your account with anyone else.
2. Reset your password if it is outdated. Click on “Account Settings” in the main menu, and then select “Password Reset.” Enter your old password and click on “Reset Password.”
3. Check for suspicious activity on your account. If you think someone may be trying to access your account without your permission, monitor your online activity and report any suspicious activity to Apple Support.
4. Restore from a backup if necessary. If nothing else works, you can try restoring your account from a backup. To do this, go to “Settings” in the main menu and select “General.” Under “Restore from Backup,” select the date of the backup that you want to use, and enter your Apple ID password when prompted.
Check the status of Apple servers
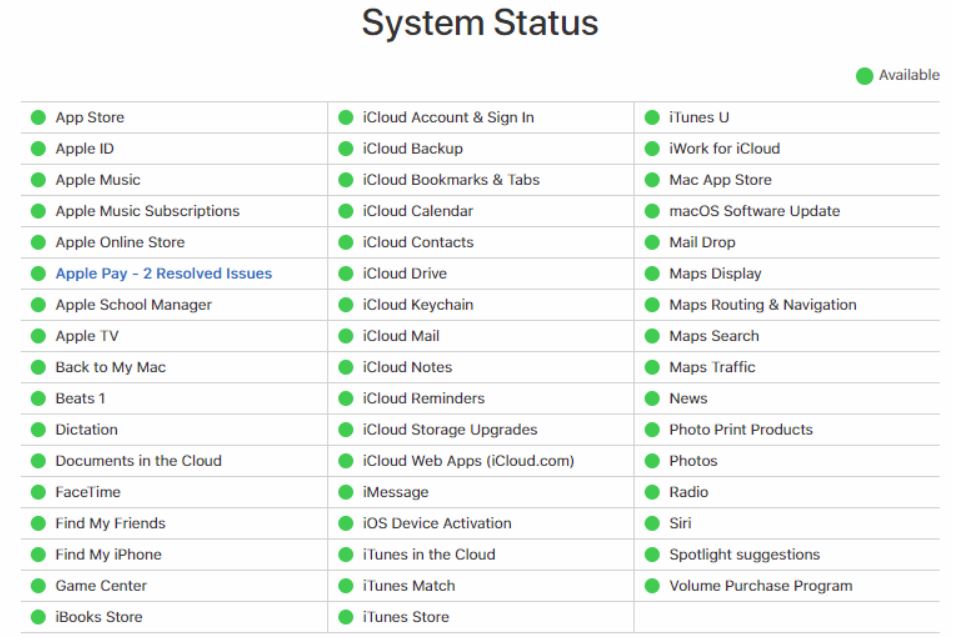
If you are experiencing an error connecting to the Apple ID server, there are a few things you can check to determine the cause.
Check the status of your Apple ID. Make sure that your computer is connected to the Internet and that you have recently updated your software. Check to see if you have enabled two-factor authentication on your account. If you are still having trouble connecting, please contact Apple Support.
Test your WiFi connection
If you are having problems connecting to the Apple ID server, there are a few things you can test to see if your WiFi connection is the issue.
1. Make sure that your iPhone or iPad is connected to the same WiFi network as your computer.
2. Try different WiFi networks and see if the problem persists.
3. Make sure your computer and iPhone or iPad are on the latest software versions.
4. Try unplugging and replugging your iPhone or iPad into your computer and see if that resolves the issue.
Turn off your VPN

If you’re experiencing an error connecting to the Apple ID Server, one solution might be to turn off your VPN. This will disable any unofficial connections you have made and force you to connect through the official network. You can always re-enable your VPN once the problem is resolved.
Sign out of Apple ID

If you’re experiencing problems with “There was an error connecting to the Apple ID server,” try these steps:
1. Sign out of your account by going to your Account settings and clicking on “Sign Out.”
2. If that doesn’t work, try again logging in using your username and password at appleid.apple.com.
Request an Apple ID verification code
If you’re having trouble connecting to the Apple ID server, there are a few things you can try. The first is to request an Apple ID verification code. This will help verify that you’re using the correct account and improve your chances of connecting successfully. You can find more information on requesting an ID verification code here.
Change your Apple ID password
If you’re having trouble logging into your Apple ID, there are a few things you can try.
First, make sure that you’ve updated your password. If you’ve changed your password in the past and are still having trouble logging in, try resetting your password. If that doesn’t work, try these other tips:
– Try turning off two-factor authentication if you use it.
– Reset your iCloud account if you’re having trouble logging in to iCloud.
– Check to see if there’s anything blocking the connection between your computer and the Apple ID server. This can include things like a firewall or antivirus software.
– Try using a different network connection.
Set date and time to automatic
If you are experiencing an error connecting to the Apple ID server, there are a few things you can do to try and fix the problem. One way to try and fix the issue is to set your computer’s date and time to automatic. To do this, open up Settings on your computer and navigate to System > Time & Currency > Date & Time. From here, you can select Automatic (which will set your computer’s date and time to Daylight Saving Time if it is currently adjusted) or set your time zone. If you have already changed your computer’s date and time, setting it to automatic may not help. In order for this setting to take effect, you must restart your computer.
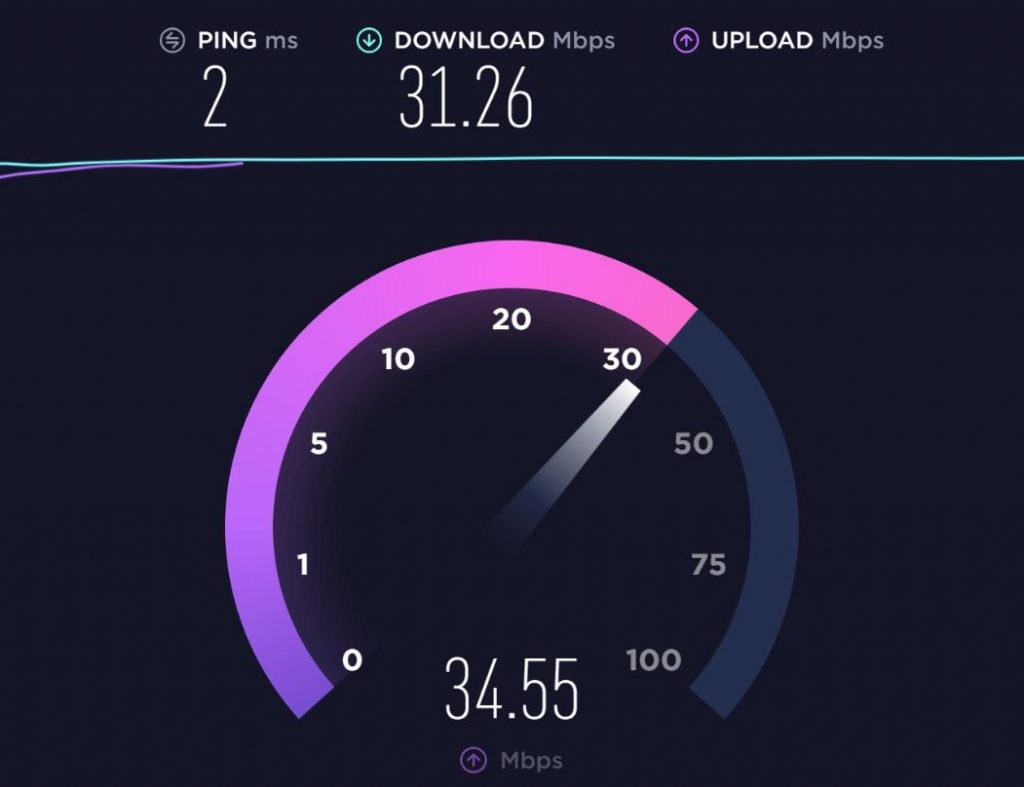
Some other things you can do in order to try and connect to the Apple ID server include: verifying your network connection by checking your internet speed; turning off any firewalls or anti-virus software that might be interfering with communications with the Apple ID server; changing your Apple ID password if you have one set; and verifying that you are using the same Apple ID that was originally registered with your device.
Restart or update your Mac
If you’re having trouble logging into your Apple ID or if you’re just getting a message that there was an error connecting to the Apple ID server, there are a few things you can try.
First, restart your Mac. This can sometimes fix connectivity issues. If that doesn’t work, you can try updating your Mac software. This can fix problems with older programs or updates that have gone wrong.
How to keep your passwords secure
If you’re one of the unlucky ones who have been struggling to keep your passwords secure lately, you’re not alone.
According to a recent report from SplashData, there has been a 62% increase in password-related security breaches over the past year. And although many of these breaches seem to be the result of people simply forgetting their passwords, others are the result of hacks into centralized databases like LinkedIn and Dropbox.
So how can you protect yourself from these kinds of attacks?
The first thing you can do is make sure that your passwords are strong. This means creating complex passwords with at least 8 characters and using different types of characters (uppercase, lowercase, numbers, and symbols) to make it harder for someone to guess them.
Another important step is to change your passwords regularly. If you don’t think you’ll be able to remember your new password immediately, create a password manager where you can store all of your passwords in one place. This way, even if one of your passwords falls into the wrong hands, they won’t be able to use it to log in to any of your accounts.
Finally, make sure that your login credentials are always encrypted when they’re sent over the
How to make your logins as safe as possible
If you’re experiencing an error connecting to the Apple ID server, there are a few things you can do to make your login as safe as possible.
1. Verify that you’re using the correct Apple ID. Make sure you’re entering your registered email address and password, not a temporary account or a guest account. If you’re not sure which account you’re using, click on “Your Account” in the upper-right corner of the App Store, then select “Account Info.”
2. Verify your connection to the Apple ID server. Make sure you’ve connected to the network correctly and that your computer is connected to the Internet.
3. Check for blocked ports and protocols. Sometimes malicious computers or networks can block certain ports, preventing your computer from connecting to the Apple ID server. You can try opening some common ports in your firewall software to test if they’re blocked; these include port 25 (mail), port 443 (SSL/HTTPS), and port 80 (HTTP).
4. Use two-factor authentication whenever possible. Two-factor authentication requires you to enter not only your password but also a code sent to your phone in response to a text message or a push notification. This way