Chromebooks are known for their quick and lightweight computing experience. This makes it perfect for users who need to take their work with them wherever they go. However, one downside of Chromebooks is that they do not support mouse or keyboard shortcuts. This means that many activities, such as clicking on links or opening files, can be time-consuming and frustrating if you have to use the keyboard instead of your mouse. Fortunately, there’s a workaround: you can enable auto clicker on your Chromebook. Here are the 3 best auto clickers for Chromebook: 1) Auto Clicker for Chrome: Auto Clicker for Chrome is one of the most popular auto clicker extensions available for Chrome. It’s simple to use and can be installed in seconds. With Auto Clicker for Chrome, you can automatically click any link or file that you want. 2) Mouse Gestures: Mouse Gestures is another great auto-clicker extension for Chromebooks. It allows you to use mouse gestures to automatically open links or files. This is a great option if you have difficulty using the keyboard or if you want to avoid having to touch your computer screen every time you want to open a file. 3
Auto Clicker For Chromebook – An Overview
Chromebook owners rejoice! There’s finally an auto-clicking extension for your Chrome browser that will make your life a lot easier. The aptly named “Auto Clicker” extension lets you automate the clicking of any links or items on webpages, making it much easier to navigate through pages and websites.
Auto Clicker is available as a free and premium extension, with the premium version offering a few extra features such as customization of the speed of the click, pause and resume functionality, and global hotkeys. If you want to try out Auto Clicker without spending any money, there is also a free version available which has some limitations but still provides some good value.
To enable Auto Clicker on your Chromebook, first, make sure that you have the latest version of Chrome installed. After that, open up Chrome browser and click on the three lines in the top right corner (menu bar). Now select “ extensions ” from this menu and search for “ Auto Clicker .” When Auto Clicker appears in the results, click on it to install it. (If it doesn’t appear in the results after searching for it, then you may not have the latest version of Chrome installed.)
After installing Auto Clicker, open up its settings by clicking on its icon in the toolbar or by going to chrome://extensions. On this page, you will see two options – one for enabling/disabling Auto Clicker, and another
Why 30 Million Chromebooks Users Are Using Free Auto Clicker For Chromebook?
Chromebooks are known for their simplicity and lightweight design. This makes them perfect for people who want to use their computers primarily for work or school. However, one downside of Chromebooks is that they don’t have a lot of features that other laptops do. One feature that Chromebook users might miss is the ability to automatically click items on a screen.
One solution to this problem is to use an auto Clicker for Chromebook. Auto Clickers are software programs that watch your mouse movements and automatically execute the appropriate action, such as clicking on a piece of text or an image. There are a number of different auto Clicker Chromebooks available online, and it’s easy to find one that fits your needs and preferences.
To enable auto Clicker on Chromebook, you first need to find an auto Clicker for Chromebook that meets your specifications. Then, you’ll need to install the program on your computer. After installation is complete, you’ll need to configure the auto Clicker for Chromebook settings so it works properly with your computer. Finally, you can start using the auto Clicker for Chromebook!
How To Install/Use/Download Auto Clicker For Chromebook?
Auto Clicker is a Chrome extension that allows you to automatically click any link or text in your browser. This can come in handy if you find yourself clicking the same links over and over again, or if you need to quickly open a number of tabs or pages.
To install Auto Clicker on your Chromebook, you first need to download the extension from the Chrome Web Store. Once it’s downloaded, you’ll need to open Chrome and click on the three lines in the top right corner of the screen. From here, you’ll select “Settings” and then “Extensions.” Once inside the Extensions page, simply click on the “Add new” button and search for “Auto Clicker.” When it appears under “Available extensions,” click on it to add it to your browser.
Now that Auto Clicker is installed, all you have to do is start using it by opening a web page or link that you want to automatically click. When the page loads, press the control key (cmd on PC) and A at the same time. This will activate Auto Clicker and allow you to start clicking whatever is onscreen.
If you ever want to disable Auto Clicker, just repeat these steps but omit pressing control+A when activating Auto Clicker. You can also disable auto Clicker completely by opening chrome://extensions/ and unchecking “Enable AutoClicker.”
Method 1: Use In-Built Auto Clicker For Chromebook
1. Open Chrome browser and sign in to your Google account.
2. Click on the three lines in the top right corner of the browser window and select “Settings.”
3. Under “Advanced,” click on “Web & App Activity.”
4. In the “Web Activity” section, under “Chrome tabs,” click on the locked icon next to the “Auto-login” entry and uncheck it.
5. To enable auto-clicking, check the box next to “Enable Auto-clicker.”
6. Click on “Save changes” at the bottom of the window.
7. To start using auto-clicking, open a website you want to automatically open in a new tab or window, and press and hold down the Ctrl key (on Windows) or Command key (on Mac) while clicking on one of your open tabs or windows. When you release the keys, your selected tab or window will automatically close and open a new tab or window with that website loaded – perfect for quickly jumping back into that webpage!
Chromebook Auto Clicker Customization Features
Chromebook Auto Clicker Customization Features
Enable Auto Clicker on Chromebook:
1. First, open the Chrome browser on your Chromebook and sign in to your Google account.
2. In the toolbar at the top of the Chrome window, click the three lines in the upper right corner that say “Settings.”
3. Under “chrome://settings/,” click “Advanced.”
4. Under “Auto-click settings,” click “On.”
5. Click “Manually adjust speed” to set the speed of your cursor’s auto-clicking. You can choose from Fast (200 milliseconds), Normal (500 milliseconds), or Slow (1 second).
6. To enable voice control for auto-clicking, under “Auto-click settings” click “Use voice control.” Tap any of the following three options: On a long press: Say something like, “Click here” followed by a space and then your desired command (ex: “Open YouTube”). Tap once: Say something like, “Click” followed by a space and then your desired command (ex: “Open YouTube”). Hold down for 2 seconds: Say something like, “Hold down for two seconds” followed by a space and then your desired command (ex: Open YouTube).
7. To disable auto-clicking, under “Auto-click settings” uncheck the box next to “On.” When you’re done configuring auto-clicking on Chromebook, close all of the Chrome
Method 2: Use Auto Clicker For Your Chromebook Browser
So, do you want to use Auto Clicker for your Chromebook browser? Great! Here are the steps:
1. Open Chrome and click on the 3 lines in the top right corner of the window.
2. Click on ” Settings “.
3. Scroll down and click on ” Keyboard “.
4. Under ” Key bindings “, click on ” Add new keybinding “.
5. In the dialog that pops up, type ” ctrl+shift+a ” (without the quotes) and hit enter.
6. In the ” Keyboard Shortcuts” box that appears, select ” Auto-type text… “.
7. Underneath that, click on ” Choose default action “, and select ” Auto-click links “.
8. Click on OK to save changes and close the keyboard settings window.
9. Now you’re ready to start using Auto Clicker! To use it, just press Ctrl+Shift+A (or Cmd+Shift+A on a Mac) when you’re online and want to open a new tab or window with that web page open in your default browser app. You can also use it for opening files from your Downloads folder or open Recent Docs if you use Pinboard as your default browser extension.
Applications of Auto Clicker
Auto clickers are great tools for increasing productivity on your Chromebook. They allow you to automatically execute a task or set of tasks without having to manually click them. This can be helpful if you have a lot of tasks that you need to regularly repeat or if you find yourself constantly clicking the same buttons or links repeatedly. There are a number of different auto clickers available for Chromebooks, so it can be difficult to decide which one is best for you. In this article, we’ll discuss some of the best auto clickers for Chromebook and recommend one that will suit your needs.
1. Chrome Auto Clicker
Chrome Auto Clicker is the most popular auto Clicker for Chromebooks. It’s free and easy to use, and it works with both desktop and mobile versions of Chrome. Simply install the Chrome Auto Clicker extension and start using it!
2. ClickOnce Auto Clicker
ClickOnce Auto Clicker is another great option for users who want an auto Clicker that works with both desktop and mobile versions of Chrome. It’s also free, but it does require registration (which is simple and painless). Once registered, ClickOnce Auto Clicker will work with all your devices, regardless of whether they’re connected to the internet or not.
3. Tasker Auto Clicker
If you want an auto Clicker that can do more than just repeat a single task over and over again, then Tasker Auto Clicker is the perfect option for
Top Three Auto Clicker For Chromebook (With Pros and Cons)
1. There are a few auto clickers for Chromebook that you can use to help automate tasks or to make your life easier. Before choosing one, be sure to read the reviews and decide which is the best fit for you.
2. The two most popular auto clickers for Chromebook are Clicks4Chromebook and DotnetAuto Clicker. Both offer different features and benefits, so it’s important to choose the right one for your needs.
3. Here are some pros and cons of using each auto clicker:
• Clicks4Chromebook: This auto Clicker offers a wide range of features, such as configuring options, tracking clicks, recording macros, exporting data, and more. It also has a user-friendly interface that makes it easy to use. However, some users have reported issues with Clicks4Chromebook freezing or crashing on occasion.
• DotnetAuto Clicker: This auto Clicker is less feature-rich than Clicks4Chromebook but is simpler to use and faster in performance. Some users have found that it doesn’t work well on certain types of websites or that it crashes frequently.
No.1 – Auto Clicker by GitHub
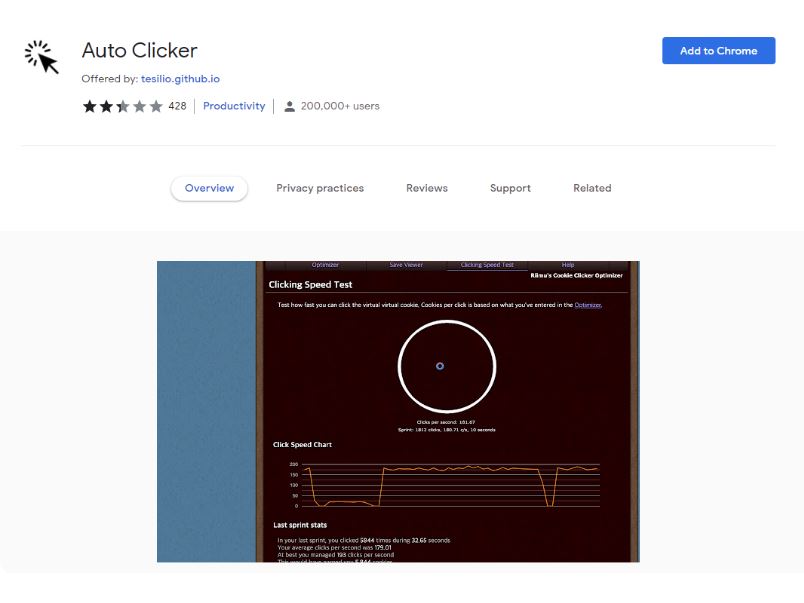
If you’re one of those people who just can’t seem to get enough of clicking, then you’ll love Auto Clicker by GitHub! This Chrome extension allows you to automatically click any link or document that you visit. Plus, it’s compatible with a wide variety of websites and documents, so there’s no need to worry about compatibility.
To enable Auto Clicker on your Chromebook, open the Chrome browser and click on the three lines in the top right corner of the screen. From here, select “More tools…” from the menu and then “Settings.” On the next page, scroll down until you find “Auto click settings.” Click on this and enter your desired timer interval (in seconds) and auto-clicking mode (on/off). Finally, hit “Apply” and congratulations – you’re ready to start clicking away!
No.2 – Auto Clicker – AutoFill by getautoclicker.com
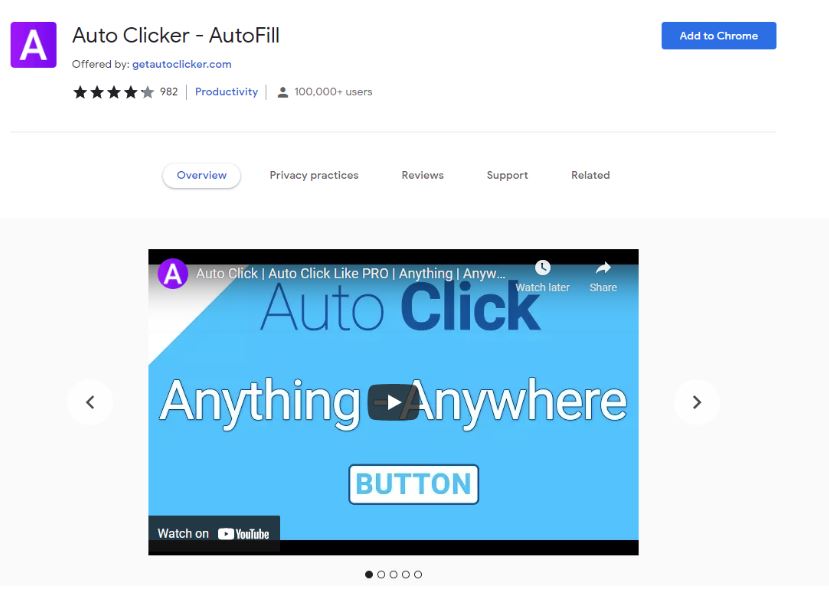
Chromebooks are now powerful devices that can be used for various purposes. One of the best ways you can use your Chromebook is by using the auto Clicker extension. Auto Clicker is an easy-to-use extension that allows you to automate certain tasks on your Chromebook.
Enable Auto Clicker On Chromebook
To enable Auto Clicker on your Chromebook, follow these steps:
Open Chrome Settings by pressing Ctrl+F2 or clicking on the three lines in the top right corner of the Chrome browser window. On the settings page, click on Extensions. In the Extensions section, locate and click on Auto Clicker. Click on Enable to enable Auto Clicker on your Chromebook. Restart your Chromebook if it is not already restarted for changes.
Auto Clicker by getautoclicker.com is one of the best extensions for automating tasks on your Chromebook. It is simple to use and allows you to quickly automate tasks such as filling out forms or clicking links.
No.3 – GG Auto Clicker by autoclicker.gg
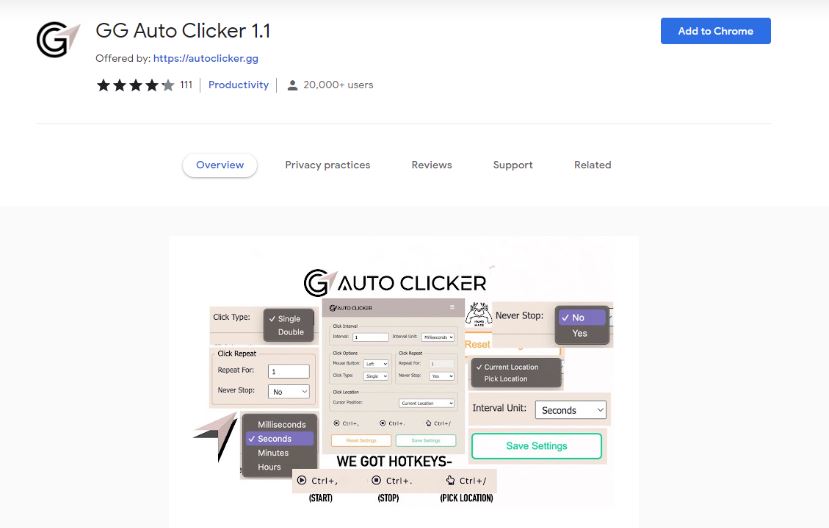
If you’re one of the millions of Chromebook users, chances are you may have come across an app called GG Auto Clicker. This handy little app automatically clicks links for you, making life a bit easier when it comes to online navigation. However, if you’re not familiar with how to enable auto clicker on Chromebook, or if you’re looking for the best auto clicker for Chromebook, then this guide is for you. We’ll outline the steps necessary to get GG Auto Clicker up and running on your device, as well as recommend some of the best auto clickers available.
Enable GG Auto Clicker On Chromebook
The first step is to open up Chrome browser and navigate to chrome://extensions/. Once there, locate GG Auto Clicker and click on the downwards arrow next to it. This will open up the settings page for the extension. On this page, we need to ensure that the option ‘ Enable on startup ‘ is selected. We can then click on ‘ Save Changes ‘ to finalize our changes. Now that we’ve enabled GG Auto Clicker on our Chromebook, every time we launch Chrome it will automatically start using its features.
Best Auto Clicker For Chromebooks
Now that we’ve set up GG Auto Clicker and made sure it’s activated on start-up, we need to find a good auto clicker for Chromebooks. There are a number of great options available online and in stores, so it’s important to choose one that suits
[BONUS] Try Roblox Auto Clicker For Chromebook
Roblox is a massively multiplayer online platform game developed and published by ROBLOX. It is played through the use of keyboards to control characters within a 3D environment. The game can be played on Windows, macOS, iOS, Android, and Oculus Rift platforms. In Roblox, users can create their own games and communities, which other players then can visit to watch or join in on gameplay.
Auto Clicker for Chromebook allows you to automatically click objects in the game as you play it. This makes playing the game much more comfortable since you don’t have to keep pressing the mouse button continuously. Auto Clicker for Chromebook also has a few other features that are great for gamers. For example, it can track your clicks so that you can see how many objects you have clicked in total and how many more remain to be clicked. This information is also displayed in the status bar at the bottom of your screen so that you don’t have to remember what number corresponds to which object. Additionally, it has a timer that tells you when your current click counts toward your goal percentage. This gives you an idea of how far along in the game you are and lets you know when it is time to take a break or continue playing.
If you want to enable Auto Clicker for Chromebook on your device, here are the steps that you need to follow:
1) Open Chrome Web browser on your Chromebook device
2) Click on the
How to get auto clicker on chromebook for Roblox?
Chromebooks are great for business or school, but they can be a bit limiting when it comes to using some of the more advanced online tools. Luckily, there’s an easy way to get around that – with an auto clicker! There are a few different options for auto clickers on Chromebooks, but we recommend the best one for ChromeOS users – Auto Clicker by My Auto Clicks. This tool is simple to use and enables you to automatically execute any command or task you set it to.
To get started, open Auto Clicker by My Auto Clicks and select the “Add new task” button. You will then be able to enter the commands or tasks you want Auto Clicker to perform. Click the “Create” button to save your task and start clicking away!
Things to consider before using a Roblox auto clicker:
Chromebooks are great for basic web browsing, writing, and email, but they can also be used to run Roblox. There are a few things you should consider before using an auto clicker on your Chromebook. First, make sure your Chromebook has the latest version of the Roblox app. The app automatically updates so you don’t have to worry about it. If your Chromebook doesn’t have the latest version of the app, we recommend downloading it from the Google Play Store.
Second, make sure your device has a webcam and microphone. These are required in order to use an auto clicker with your Chromebook. Third, make sure your device has enough storage space. Auto clickers eat up a lot of storage space so you want to make sure your device has enough room for it. Fourth, be aware that some devices may not work with auto clickers properly. Make sure to test an auto Clicker out on a few different devices before using it on your Chromebook. Fifth, be prepared to spend a little bit of time getting used to using an auto Clicker. It takes some time to get used to how it works and how best to use it
Current Scenario and Future of Chromebook Auto Clicker
As the technology industry evolves, so does the way people use their devices. With this in mind, Chromebook users might be wondering if there is a way to enable auto-clicking on their Chromebook. Here is a look at the current scenario and future of Chromebook Auto Clicker.
The Current Scenario
Today, there are a few auto-clicker apps available for Chrome OS. However, not all of them are compatible with all Chromebooks. For example, the popular “Clipper” app only works on certain Samsung Chromebooks. Another app called “Auto Click Me!” only works on Google Pixel and Nexus devices. And finally, “Auto Clicker Pro” is compatible with most Chrome OS devices but does not work with all websites out of the box due to security restrictions put in place by Google.
The Future of Chromebook Auto Clicker
Although there are currently several apps that work to automate clicking on links and content within ChromeOS, it is likely that this number will decrease as Google continues to restrict access to additional features on its platform in an effort to keep users safe. This means that relying strictly on third-party automation tools may become less feasible in the future unless they can be updated more frequently or work with new websites and browser extensions released by developers.
Overall, while automatic clicking functionality is not yet available on every website or device out there, it seems likely that it will become more widespread over time as Google relaxes its
Chromebook auto clicker is a feature that helps you automate various tasks on your Chromebook. You can use it to open websites, run programs, or even write essays. Auto clicker is available on most Chromebooks and can be enabled in the settings menu. Here are some FAQs related to auto clicker:
How do I enable the auto clicker on my Chromebook?
To enable auto clicker on your Chromebook, go to the settings menu and select ” Auto Clicker “. You will need to sign in with your Google account to access the settings menu. After you sign in, you will see the Auto Clicker options. To enable auto clicker, check the box next to “Enable Auto Clicking”.
Q1. How to get an auto clicker on Chromebook for Roblox?
Chromebooks are popular devices for accessing the internet and running various applications. One of the most commonly used applications on Chromebooks is Roblox. Roblox is a social online game that allows players to create their own games and share them with others.
Auto-clicking can be helpful for users who have trouble sitting still for long periods of time or who need a less active form of input when playing Roblox. There are several different auto clickers available for use with Chromebooks, but this guide will focus on using the best one for Roblox—the aptly named RoboClixer. RoboClixer is a free application that has been specifically designed to help users automate the clicking of buttons in games.
Once RoboClixer is installed and initialized, it will become visible in the Chrome menu bar as an option under Tools > Auto Clickers. To use RoboClixer, first, open the game you want to automate and click on one of the buttons inside it. RoboClixer should automatically detect which button was clicked and start counting down from 5 seconds. When the countdown timer reaches 0, RoboClixer will force close the game window and launch another instance of it in a new tab. This process can be repeated as many times as desired until the desired action (clicking a button) has been completed.
If you find that your hands get tired quickly while playing Roblox, then using an auto
Chromebooks come pre-loaded with a number of helpful tools, but one of the lesser-known features is the ability to use an auto clicker.
Auto clicking can be a handy tool for those who need to keep track of multiple tasks and don’t have time to constantly press the ‘click’ button on their mouse.
To enable auto-clicking on Chromebook, open the settings menu on your device and click on ‘ Keyboard & Mouse. Under ‘Auto Clicking’, make sure that the box next to ‘On every document’ is ticked.
Once you have enabled auto-clicking, you will need to find a suitable auto-clicker for your Chromebook. Our favorite automatic clicker app for Chrome OS is Auto Clicker Pro. It has a user-friendly interface and is compatible with both Android and iOS devices, so you can use it on any device that has an internet connection.
Q3. How to get an auto clicker for Chromebook?
If you want to use an auto clicker on your Chromebook, there are a few things you need to do. First, find an app that will work with your Chromebook. Second, enable the feature in your Chromebook settings. Finally, locate and click on the auto-clicker icon to start using it.
To find an app that will work with your Chromebook, look for something that is compatible with Chrome OS. There are many different apps available, so it is important to find one that you will like and that meets your needs. Once you have found an app that you would like to use as an auto Clicker, open the Chrome browser on your Chromebook and visit the Google Play Store or App Store on your device. From here, search for “Chrome Auto Clicker” or “Auto Clicker for Chrome” and select from the results that appear.
Once you have found an app that you would like to use as an auto Clicker, be sure to enable its feature in your Chromebook settings by following these steps: On your Chromebook screen, press Ctrl + Shift + Esc (or Cmd +Shift+Esc) at the same time and select “Settings.” In the “Settings” window that opens, under “Display,” check the box next to “Enable auto-clicking.” Click on “OK” to finish setting up this feature.
Now that you have enabled the feature and located the auto Clicker icon, all you need to do
Q4. What is the best auto clicker for Chromebook?
Chromebooks are a great option for users who want to keep their computer lightweight and easy to use. They come equipped with a number of features that make using them more convenient, such as the ability to access your files and applications from anywhere, and the lack of a physical keyboard.
One feature that can be helpful when working on your Chromebook is the auto clicker. This tool lets you automatically perform certain tasks, such as opening a document or website, without having to manually click on each item. There are many different auto clickers available for Chromebooks, so it can be difficult to decide which one is the best for you. In this article, we’ll discuss some of the best auto clickers for Chromebooks, and recommend one that is suitable for your needs.
1) Auto Clicker for Chrome: This free utility allows you to trigger specific actions automatically. For example, you can have it open new tabs in your browser or send an email whenever you reach a certain number of pages in a document.
2) Auto Scroll: This app allows you to set up triggers that will scroll down or up a page when they’re triggered. This can be useful if you need to keep track of where you are in a document, or if you want to quickly scroll through large amounts of content.
3) Mouse Gestures: If speed and convenience are important factors for you when using your Chromebook, mouse gestures might be the option for you. With this
Q5. Are Chromebook auto clickers free for use?
Chromebooks are equipped with a feature that can be used to speed up your browsing experience. This feature is called auto clickers and they can be enabled on most Chromebooks. There are many auto-clicker apps available for Chromebooks, but we think the best one is Auto Clicker by Bytescout. It’s free to use and it works with most Chromebooks. You can also use other auto clickers if you prefer, but we recommend using Auto Clicker because it’s the most reliable and easy to use.
To enable auto clickers on your Chromebook, follow these steps:
1) Open your browser and go to chrome://settings/profile.
2) Under “Advanced settings,” find “Auto clicker” and enable it.
3) Click on the “Auto clicker” button in the bottom right corner of the window to start using Auto Clicker.